Friday, September 12, 2014

The Friday Four Roundup #9 {Favorite Fall Scents}

We LOVE Fall scents in my house. We wait all year long until Autumn comes so we can spice up the air around here ;)

Here is a small list of our top favorites:

1. Scentsy SPICED BERRIES. 
Probably my number one top scent of all time. Right now :) And it works for winter as well.

2. Scentsy COZY FIRESIDE. 
It smells just like you would imagine. You just want to curl up with a blanket and appreciate life. Also great for winter.


2. Anything pear. My husband particularly loves this Yankee Candle GOLDEN SPICED PEAR that a lovely friend gave us because she remembered I love anything pear (how sweet is that?). We like to use this one to make the house smell great, and in the kitchen as well.


4. Bath and Body Works SWEET CINNAMON PUMPKIN. This is another all time fave. My hubs and I discovered this on one of our dates at the mall as a newly married couple and fell in love with it and have loved it ever since. Awww. One thing I love about scents is that they can instantly bring back memories. This one always reminds me of fall in our first apartment and then 10+ years of fall memories since then!

Also, pretty much anything Pumpkin from BandBWorks is a winner. And it's so lovely that yummy smelling stuff isn't just limited to wax, we love to break out the festive soap this time of year too!

What are your favorite fall scents? Is it feeling like fall where you live? We still have sun and nice weather, but it is definitely getting chilly nights and mornings here. Have a great weekend!
~Rebecca

Monday, September 8, 2014

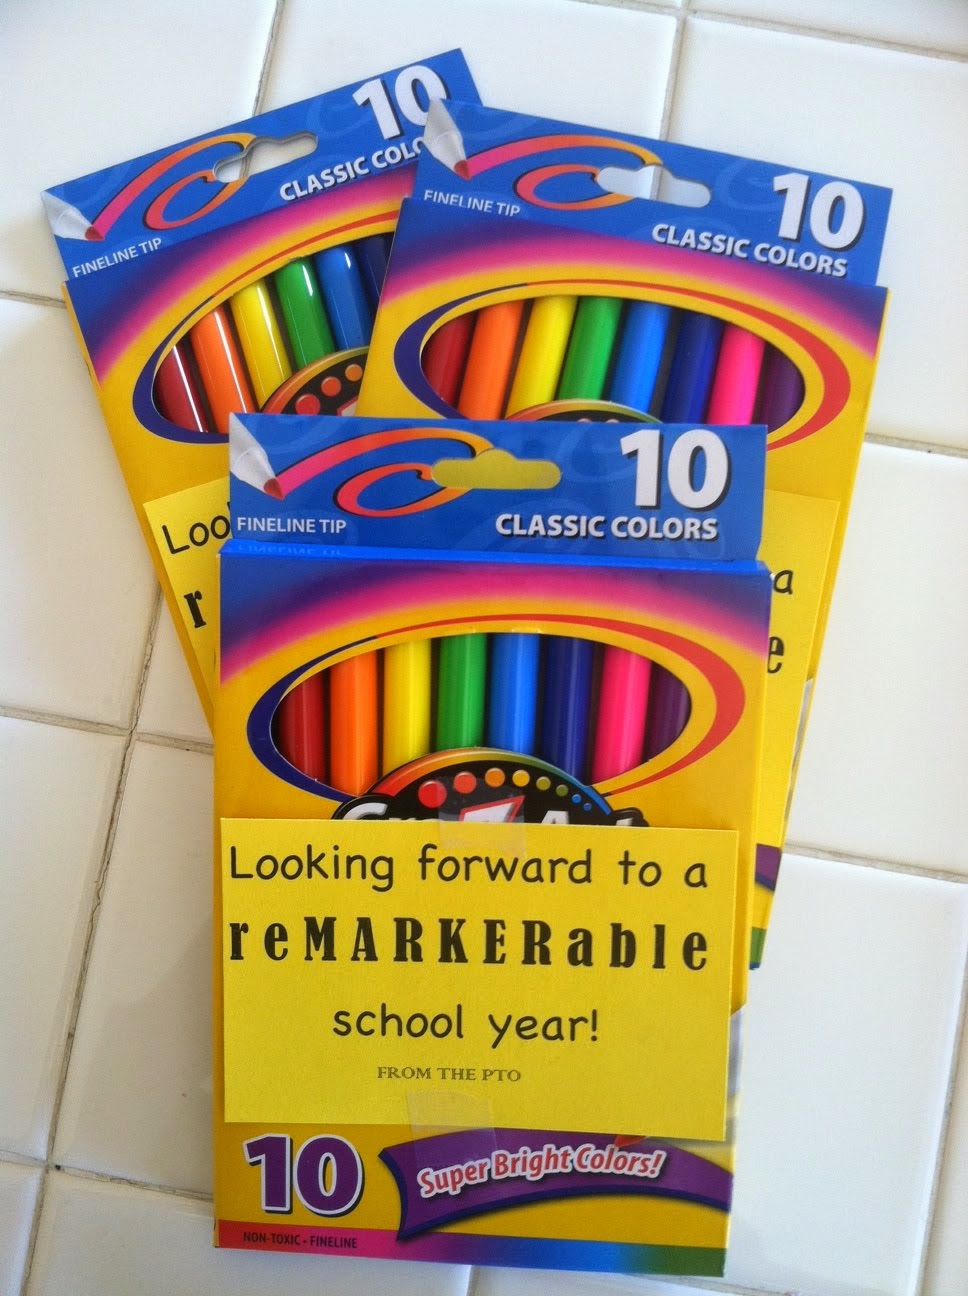
September Teacher Appreciation {reMARKERable}

I got this idea through pinterest from here.

1. Buy a ton of supplies for cheap at back to school sales! In my case, I have to find 36 of everything.

2. Type up and print your label in a word document. I thought it would be cute to use coordinating yellow cardstock.
Looking forward to a
r e M A R K E R a b l e
school year!
FROM THE PTO


3. Cut tags and attach simply with tape.

Done!

Hope your school year is off to a good start! 
~Rebecca

Friday, September 5, 2014

The Friday Four Roundup #8 {2014 Fall Fashion Edition} And some deals.

Welcome to the 2014 Fall Fashion Edition of my roundup, I hope you had a great week. Are you ready for fall? I am still in the getting ready stage. I wanted to decorate for fall this week now that Labor day is over. However, it is still beautiful sunny weather so I am soaking up every last bit of summer that I can. We have long winters here so I have learned to truly appreciate warm days. In the meantime, I can dream about my perfect fall wardrobe...

1. BASIC SWEATER. I'm loving the idea of a classic, soft, slightly oversized "slouchy" type white cable knit sweater. This one from H&M is pretty much perfect and I like the longer length in the back. Plus H&M is currently offering free shipping on a purchase of $50 or more through the 7th with code 2541.


2. JEANS. Any sweater would look fabulous paired with a great pair of skinnies. I prefer the dark wash on a pair like this, also from H&M. They have buy one pair get one 50% off right now.

3. ACCESSORIES. The obvious choice would be a scarf in warm autumn tones or perhaps a plaid. I don't like to wear something that keeps my neck warm when I'm already wearing a sweater with a high neck line though, so I think it would be fun to try something a little more unexpected like this necklace from Downeast Basics.

And of course you need a great bag. This one with a fun print is anything but boring and I love the brown for fall. 

4. BOOTS. Leather knee high or ankle are both great options. I've had my eye on this pair for quite some time. Right now Target has 20% off all their boots.

Click to view sources: 1 / 2 / 3 necklace, bag / 4

Monday, September 1, 2014

Easy Kids DIY Butterfly Canvas and Girls Room Gallery Wall

You may have noticed in the back to school post that the girl's room has changed a bit. One of the things we did was take down all their art scattered all over their walls. Then we decided what we wanted to stay and created a gallery wall. After I laid everything out there was an open spot. Since one of my daughters loves horses and she already had her horse painting in the gallery, we decided we needed a butterfly painting for my other daughter who loves butterflies. I gathered materials I already had, googled a few butterfly templates and let her pick one and then she created this canvas.


Pretty cute! I love that we have something that represents each of them in their shared space and is meaningful.

Gallery wall:

Hope you had a great long weekend, is Summer over in your neck of the woods? Can't wait to pull out my fall stuff, what about you?

~ Rebecca


Friday, August 29, 2014

The Friday Four Roundup {7}

1. Just say no to the ice bucket challenge, Matt Damon explains why. Many countries are without fresh water and here we are dumping it on our head just to see if we can challange our friends to look stupid too. If you really want to make a difference, just donate the money.

2. Ten supposed trending fashions for fall . However I would just say no to blanket coats, cropped pants, and can we PLEASE not go back to overalls?

3. Cute ideas for what to do with all the shells you collected this summer. I especially love the unique necklace idea.

4. What are you doing for your labor day weekend? We are participating in a parade this evening. Lots of sales going on, go check them out!

Enjoy your extended weekend ~ Rebecca

Monday, August 25, 2014

August Teacher Appreciation {Back to School Survival Kit}

It's Back to School time, and that means back to my Teacher Appreciation projects.

I got all the supplies at Walmart, in their back to school section. These pencil cases were 47 cents! I also picked up push pins, rubber bands, paper clips, and of course, chocolate.

I found the back to school survival kit printable tag {here}.

On the back of the tags I typed this:
This survival kit contains:
rubber bands, pins and paper clips
to help you “keep it together.”
In case of emergency:
break open chocolate.

Welcome back!

F R O M  T H E  P T O

And this is how it turned out:

Welcome back to school! Have a great week.

Saturday, August 23, 2014

No More Missing Socks {DIY Laundry Room Counter}


Hi everyone! It's Karen again. Thanks for having me back to post a project I just finished. So for a long, long time, pretty much since the day after we moved into our house 8 years ago, I have dreamed of a countertop over my washer and dryer in my laundry room. A couple of years ago, I redid the countertops throughout the house and I had a bit of laminate left over. It has been sitting in my attic as I have contemplated how in the world I was to make this project a reality. It's a really complicated project because my dryer gets hot and I need something that can easily be removed by a lady of my size alone when her man is busy bringing home the bacon. 


I had a 6 inch gap behind the dryer and the wall. 


And about a 2 inch gap on the side
.


So one day while I am discussing this problem of how to get the countertop over the washer and dryer to my friend Carol she says, "Hey, what if you use those really heavy duty shelf brackets?" What?!! Awesome! I had been trying to figure out wood along the back and sides and a pole down the middle for support. I found some brackets at a garage sale and they worked perfect. Can't beat $2 for those. 


They are all screwed into studs and are super sturdy.


Then I found a door.  A hollow core door with oak veneers on the exterior for $3 at my favorite thrift store. It didn't have a door knob hole in it and it was light weight. I trimmed it down to size (actually my man used the circular saw that's not my cup of tea). I had to re-build the door a bit with the pieces that were no longer supporting the edge. I added the oak trim along the face of it because it matches all the custom cabinetry in my house. I notched out the area for the water lines and where the plugs need to drop down through the back.

I used my router (thanks Dad) to bevel the front at a 45 degree angle also to match my house. Do you like my saw horses? Who knew two tall garbage cans are the perfect working height?

I wish I would have taken more pictures of putting the laminate on but the day I did, I put the contact cement on the laminate and the wood and just as it was about ready to stick them together, it started to rain and I was in a hurry. So just put your laminate on your wood by working one side to the other as to avoid big air bubbles, use a J roller (buy a nice one, and you will smile that you did) and roll the entire surface out. After that, don't leave it in the sun when you go to the pool - learned that this time. And yes it rained and was hot enough to go to the pool all in one day. I re-rolled the edge that was in the sun and then beveled the front with my 45 degree bit on my router. 


I then used the straight bit (thanks Carol) around the other edges and into my notches. Work slow and steady. Take your time otherwise the laminate can chip if you work too fast.


Ta da! Here we are! I love my countertop and am so excited not to use my BBQ tongs to have to reach all those missing socks!