Showing posts with label I can make that. Show all posts

Sunday, October 12, 2014

I Can Make That: Pottery Barn or Williams Sonoma Knock Off Hurricanes in Two Easy Steps! (No Cost)

I've had these hurricanes for a while. They are Threshold and I got them on Target clearance for $5 a piece. I've never been too sure of the shiny silver, though. It's not really my style. When I saw The Pioneer Woman's reveal of her new office space and I noticed the Pottery Barn Jameson Hurricanes with the beautiful rustic style, the lightbulb went off! I could make mine look like that!

I simply covered the glass with newspaper, taping in place, inside and out. I lucked out, it was easy to slip the newspaper under the silver parts so it got covered well with paint.


I used an indoor/outdoor black satin spray paint I had on hand. I had to go over it twice in some spots.


And there you have it. Love them so much more now.


This is the picture from The Pioneer Woman that inspired me:


The Pottery Barn Jameson Hurricanes:


And right before I posted this I came across some almost identical in style to mine from Williams Sonoma, the Disc Hurricane for a whopping $79!

I hope this inspires you to go spray paint something you like and make it into something you love this week :)
~Rebecca

Linking to: http://www.lizmarieblog.com/2014/10/inspire-please-linky-party-30/

Monday, June 23, 2014

I Can Make That: World Market Pie Sign Knock Off {No Cost DIY}

I saw this sign in the kitchen of a couple bloggers and at Cost Plus World Market and I fell in love with it. I love the vintage look and PIES are my favorite! I contemplated buying it for $15 but then I thought "I can make that!" Using supplies I already had, I created one of my own.


First I found an old 8x10" frame. It was actually already white like the original but I wanted some sage green in my kitchen so I painted it with acrylic that I already had. Then I cleaned the glass with Windex and then made sure it was dry. Obviously, you'll need to take out the backing of the frame.

For those of us who are OLD SCHOOL and do NOT have a fancy schmancy vinyl cutter, you can print your letters and cut them out and use them as stencils. I went into my word program and just found a font that I liked and that was the most similar to the original sign. After printing, I cut each one then placed them on the glass where they should go. I used a salad plate as a template to get the curved letters on top.


I used washi tape to place them since washi wouldn't get sticky all over the glass. Then I used a thin Sharpie permanent marker to outline all the letters. Next I used a small paint brush and black acrylic paint to paint the letters. This is where PATIENCE comes in and I always WISH I had a vinyl machine. It took three coats until I could hold it up to the light and not see through the letters. Even though it was tedious, I love the way it turned out and the real hand-painted letters reminded me of authentic old signs. I was able to put the glass in the frame and press down the metal thingies that hold the backing in and that worked great and you couldn't see them through the glass, but you might need to glue the glass in place.


Ta-dah!!! Not bad compared to the original, right? And it cost me NOTHING!


And this is what it looks like hung up in our kitchen! (Ignore the dumb cord that hangs down and drives me nuts.)


Hope you are enjoying your summer and have a great week!

linked to 
http://www.lizmarieblog.com/2014/06/inspire-please-linky-party-14/

Sunday, December 15, 2013

DIY Wood NOEL Letters with Berry Wreath {Quick, No Cost Project}

Last week while I was checking out some Christmas home tours through blogland, I came across these cute NOEL letters and I thought "hey I could do that with some old ones I have!" So this was my inspiration which you can see by going HERE:

DIY "Noel" display from The Chronicles of Home

Now my letters are small but it was fun to make them "new" again.

BEFORE:

AFTER:

I used dark and light burlap and scrapbook paper, white paint, elmers glue and the berry stem all things I had on hand so I spent zero money (woot!)


Have a great week!

Tuesday, May 29, 2012

I Can Make That And I Did! Pottery Barn Inspired Moss Wreath {low cost project}

When I saw a moss wreath in the PB Christmas catalog about two Christmases ago, I thought "I could make that!" and have been wanting one ever since. I finally found the perfect place to hang one - over the kitchen sink. I like the idea of green plants in the kitchen but do not like taking up any counter space so this was the perfect solution.
For this project I used two bags of moss from the Dollar tree, a raffia/hay wreath I found at a thrift store for $1, a hot glue gun with several glue sticks, and a leftover ribbon I had saved. Total cost with glue was about $3.50 plus tax.
NOTE: this takes alot of hot glue, I used 3 - 4 long glue sticks, or 6 - 8 regular size glue sticks.
Also note that this moss is VERY messy! It is the WORSE for messes so do it outside if you can. I did it in a box but I would recommend doing it in a box, outside!
I bought two different types of moss from the dollar tree because I wanted it green like the spanish bag but liked the look and texture of the other so I mixed them! To do this I emptied them into a grocery bag and took it outside and mixed them together inside the bag as best I could, kind of breaking it up and mixing.
Then I started hot gluing all around the front of the wreath in about 4 inch sections.
Another NOTE: You will burn yourself! So be prepared. After putting on the hot glue I would covered it wirh some moss and press down. Continue this all around the wreath in front, then back, then inside, and outside.
Next look it over and fill in any missing spots.
Then give it "haircut!" trimming any extra long or unruly pieces that stick out.
Then I took it outside and gave it a good shake. Don't be shy!
I found a nice wide piece of white ribbon in my stash for hanging. I decided it needed a lil' somethin' so I glued 3 little yellow apples that were also in my stash. I really wanted lemons but they were too big. This wreath would also look great with a single row of lemons around the front.
I hung it up and voila! It looks perfect! And it cost next to nothing, especially compared to what PB charges.
Do you love it as much as I do?!
Thanks for checking out my latest project!

Thursday, March 29, 2012

I Can Make That: Pottery Barn Rustic Bunnies

I received my lovely spring PB catalogue in the mail and I'm in love with its simply beautiful green & white, tulips & bunnies goodness.
I went thrifting with a friend the other day and snagged this cute terra cotta bunny for $1 so I can give it a "weathered white glaze" and make it look just like these $39 - $49 "Rustic White Bunnies."
Not bad, eh? What inspires you?

Monday, December 19, 2011

I Can Make That: West Elm Crafty Christmas

(sorry for the cruddy pics, I snapped them from the actual catalog). I saw these in the latest West Elm catalog and thought they would be so fun and easy to make: a hand- stitched pine branch pillow and hand-cut snowflake ornament from felt. Easy peasy and full of style!
Have you seen anything lately that you think you could make from a name brand?

Wednesday, July 20, 2011

I Can Make That, and I DID! Pottery Barn Kids Monogrammed Bath Towels

My 3 little kidlets are growing out of their hooded towels (sniff, sniff) and a few of them are getting just plain worn out. My awesome S-I-L made a few when they were born and they have been loved to pieces.
A couple months ago I saw this picture in the PB Kids catalogue and the wheels started turning. I would have just dealt with the old towels a little longer cuz I'm cheap like that, however my family and I are relocating in a couple weeks and there is, a-HEM, one....bathroom...for my family of five. And I'm just gonna need a straight clean line of towels for each one of us that can be hung or hooked and that's that.

Personalized Applique Essential Bath Towels

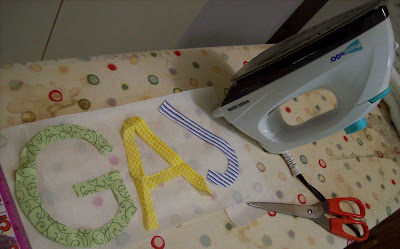
So, here is the beginning of the project! Get all your stuff together first of course.

I printed out their initial on the computer and cut them out. Then I let the kiddos pick which fabric they like from my scraps, (only requirement was that they must coordinate with the shower curtain, of course!)

Continuing with my love/hate relationship with Walmart, The best price I found for decent sized and thickness of white towels was at Walmart for about $3.45 a piece.
Just so you know, the PB ones are about $22.50 a piece and not sure if that includes the personalized name.

Then I took Wonder-under, a fusible iron on interfacing and ironed away.

The fabric is now stuck to it and you cut it out.

Then peel the backing off and measure and center your letter where you want it and iron some more. (Don't you love my vintage Smurf ruler?! Yes it is the real deal, and yes I still have and use it!)

And voila! It is on the towel, ready to be appliqued.

Unfortunately, my sewing machine broke! So they sat like this for a few days. But my wonderful momma came to the rescue!

She satin-stiched them for me (again in the colors the kids chose, thus the pink with the yellow letter) and they look picture perfect! Thanks, mom.


Aren't they GREAT?!

Again, the inspiration:
Personalized Applique Essential Bath Towels

And my finished product:
Perfect.


linking to these parties:

and featured on:

Tuesday, May 17, 2011

I Can Make that: Pottery Barn Black & White Prints

Framed Vintage Black & White PrintsIn my early summer Pottery Barn Bed and Bath catalog, I saw these "Vintage Black & White Prints" for sale. "We love the finely detailed images found in Victorian newspaper ads. Here, we highlight their artistry by presenting each as a framed print. Hardwood frames are painted black. Large print set includes bowler hat, purse. Medium print set includes top hat, boot. Small print set includes pocket watch, key, bumble bee." Prices are $99 and $49. R e a l l y?
Oh, look! Two seconds on The Graphics Fairy finding images and a couple minutes spray painting some old frames black and BOOM. Here's my own set of vintage black and white prints for free.
Thank you very much.
This would be the "small print set":

pocketwatch-clipart-graphicsfairy006b.jpg

[1abeesgfairy003.jpg]


Friday, January 7, 2011

Happy New Year, I can make that, and more....

So my sister in law brought it to my attention that I hadn't posted since Thanksgiving. It's true. I have been busy with more important things.
But the other day I got my new Ballard Designs catalog and I just HAD to post an "I can make that!" It's just so ridiculous......
So right now, you can buy and "Antique Book Bundle" for a mere $18 plus shipping a handling!!! OR, you can pull some old books off your shelf or get 4 for a buck at a yard sale, pull the covers off and wrap in twine. Whatd'ya think?
Oh, by the way,
Happy 2011!!! I hope you have a wonderful year!