Showing posts with label before and after. Show all posts

Sunday, April 8, 2018

My New Headboard and Master Bedroom Reveal! {DIY Project - Before and After}

We have been without a headboard since our last one broke when I tried to move it myself several years ago. The old one was a great Ikea wood bed frame that honestly lasted much longer than expected considering how many times it had been moved, taken apart, and put back together.
When my husband asked me what I wanted for my birthday back in January, I showed him the plans for the King farmhouse headboard online and he totally came through, as he always does! Of course it took a few more months and some teamwork to actually get it finished, but all the best projects do:)

He got all the materials at our hardware store. Here is a picture of all the wood cut and laid together on my birthday:

I couldn't decide whether to paint or stain it. Or what color. After we put it together and I sanded it, we put it in the bedroom to see how it would look and think about what finish we wanted to give it.
So here is the BEFORE of our bedroom: 

And here is the AFTER!


We LOVE how it turned out. I ended up painting it white and spray painting the lamps black.

At first I was thinking of painting it black because I love contrast and it would look great against the white bedding but he didn't want to hide all of the beautiful wood.
Then I was thinking of staining it but there's nothing that would look good with my wood nighstands or hope chest. And I love my nightstands and hope chest even if they are a little dated. The nightstands are very high quality and solid wood Ethan Allens that belonged to my parents. The hope chest is a Lane cedar chest that I got from my parents for my high school graduation. Yes, even as a youth I wanted furniture for gifts, haha! Interior decor and design has always been my passion from a young age!
I love how our bedroom is full of meaningful pieces that bring me joy. Even the bedding that has been put together over the years and not bought in a bed-in-a-bag type set, makes me happy :) The quilt was a wedding gift from my husbands grandmother and he will never let me replace it, even though I have tried just because I've had to sew a few rips and tears! The king and standard pillows have pillowcases from my favorite super soft and affordable Target Threshold sheet sets. The throw pillows are my favorite color and I love my homemade Pottery Barn napkin accent pillow.
All together it has the perfect look and feel I was going for and is so "us!"

I'm so glad to be finished with this project, and on to the next!

MASTER BEDROOM SOURCE LIST:
(Click on the links below to be directed to the product page)
Ana White Farmhouse King Headboard
Headboard paint color Sherwin Williams Alabaster
White quilt is Laura Ashley from 15 years ago
Threshold Organic Cotton Solid Sheet Set in White
Threshold Printed Flannel Sheet Set in Gray Stripe
H&M Home similar Canvas Pillow Cover and Insert
Pottery Barn Block Print Blue Floral Napkin (can buy in store individually) and Napkin Pillow Cover Tutorial
Threshold Yarn Dye Stripe Ringspun Cotton Blanket Metallic Blue (not pictured)
Vintage Ethan Allen nightstands
Ikea Barometer Lamp (spray painted black)
Hobby Lobby Gray Diamond Patterned Cement Pot
Plants, similiar
Magnolia Art Print Set from here (no longer sold)
Majgull Blackout Curtains
Vintage Lane Cedar Chest

Thursday, September 24, 2015

Guest Room Reveal

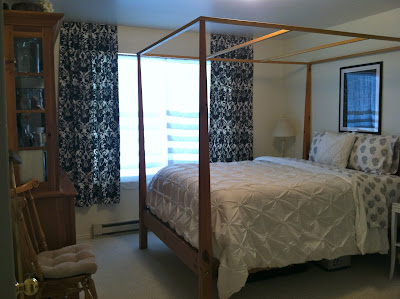
It was my goal to get this "project" done this week, and after starting on it at the beginning of June, it's finally done! This was the girls room (which you can see the "Before" photos of this room HERE), but we decided to move them upstairs this Summer and turn this into the guest room. I'm happy to report that the switch is working out beautifully. As soon as they were "moved out," my husband gave the walls a fresh coat or two of white paint. We moved all the furniture in and I have been working on getting it right. Here is the room now:


The only thing I bought for this room was some new sheets and the curtains that I scored last weekend from the thrift store for $3.75 for both!!! We love how it turned out, and since the other half of the room and closet (not pictured) is now our desk/office/craft area, it is so much more functional.

Sources
Bed, Hutch, Chair: Second hand / Ethan Allen
Black and White Curtain Panels: Thrifted
Chalkboard Art Print: Caravan Shoppe / you can read about here
Side Tables: Antique, you can read about here
Lamps: Second hand
Sheets: Target on sale
Bedding: Macy's on sale


linking to: Thrifty Decor Chick


Thursday, March 19, 2015

"Children at Play" Boy and Girl Shared Bedroom

Time for baby girl to share a room with big brother! I gave the walls a fresh coat of paint, repurposed the curtains, sewed a pillow and got a few new pieces of art/decor for the walls and the rest we already had. It turned out so great and the room feels bigger and cleaner. I am happy to report everyone is sleeping through the night now :) Sources at bottom of post.


ROOM BEFORE:


 ROOM AFTER:


Wall Color: Sherwin Williams Worldly Gray
Curtains: homemade by me using queen size sheet and old red panels
Letters: old, from Kohl's
Crib bedding: old, pink chevron sheet from Target; quilt: gift; pillow handmade from Sarah Jane Children at play fabric "On Parade." 
Twin bedding: levi quilt old, handmade by me; standard pillow sham made from repurposed mens dress shirts; throw pillow handmade from Sarah Jane Children at play fabric "Rocket Launch Club."
Wall decor/art: Art clip boards from craft fair/sister in law; I love to see the temple and Rocket Launch Club art prints from Sarah Jane Studios; On Parade canvas handmade by me; Love one another and Seek after these things art prints from Jones Design Company.


Tuesday, December 2, 2014

Organized Laundry Closet {Before and After}

While the rest of the world is putting up Christmas decorations, I spent the day finishing up a project I started over Thanksgiving Break. I had a Laundry Room (Closet) that was screaming for help. Then along came my sister-in-law, otherwise known as Ms. Fixit, and she made this project happen!


BEFORE:
 BEFORE:


She switched the washer and dryer so the dryer door wouldn't hit the closet doors and so we could move the machine right up against the wall, and to save a few inches so I can squeeze in and out on the side of the closet to get to a wasted storage space. Then she reused some wood that came from my old Ikea bed frame that fell apart, and put in three extra shelves. She used some white contact paper I had on hand to cover the shelves. She bought some cheap brackets from the hardware store and up they went!

Then today I labeled some boxes and organized the shelves and finished putting everything back.


AFTER:


I hope you had a wonderful Thanksgiving and that we can all get our Christmas decor up soon :) Thank you KAREN for making all my hopes and wishes come true for my organized laundry closet.

~Rebecca

Sunday, October 12, 2014

I Can Make That: Pottery Barn or Williams Sonoma Knock Off Hurricanes in Two Easy Steps! (No Cost)

I've had these hurricanes for a while. They are Threshold and I got them on Target clearance for $5 a piece. I've never been too sure of the shiny silver, though. It's not really my style. When I saw The Pioneer Woman's reveal of her new office space and I noticed the Pottery Barn Jameson Hurricanes with the beautiful rustic style, the lightbulb went off! I could make mine look like that!

I simply covered the glass with newspaper, taping in place, inside and out. I lucked out, it was easy to slip the newspaper under the silver parts so it got covered well with paint.


I used an indoor/outdoor black satin spray paint I had on hand. I had to go over it twice in some spots.


And there you have it. Love them so much more now.


This is the picture from The Pioneer Woman that inspired me:


The Pottery Barn Jameson Hurricanes:


And right before I posted this I came across some almost identical in style to mine from Williams Sonoma, the Disc Hurricane for a whopping $79!

I hope this inspires you to go spray paint something you like and make it into something you love this week :)
~Rebecca

Linking to: http://www.lizmarieblog.com/2014/10/inspire-please-linky-party-30/

Friday, May 16, 2014

The Coffee Table Project. {Before and After DIY}

The thing about blogs and pinterest and all these online DIYers, is that when you read them, you tend to get big ideas. Ideas that are so big that when you are in the middle of them you think, "why the heck did I think this was a good idea? Now I know why they just painted this thing black. This is a big headache and it's probably going to only be a week before my kids scratch it, knick it, and chip it." Well, either way, I did it. I love the way it looks now. But I think next time, I'll just wait till I'm rich and have money to buy exactly what I want! Sorry, if you were looking for DIY inspiration, this probably isn't the best post :) But I don't like to paint or stain furniture in the first place, so I don't know why I thought stripping and refinishing would be any better. So hopefully you are better at this stuff than me!

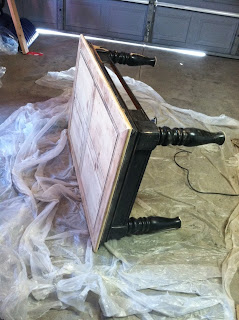
We got this coffee table second hand from some friends. It went to my husband's office, then we inherited it when his office closed. Which I was really excited about since we haven't had a coffee table for 5 years and this one is solid wood and substantial. The black paint they had done over the original finish was chipping and peeling so I figured it was time for this table to get a new life. After I saw someone do this on a blog, then read about it on ehow, it sounded easy peasy. So I read all the instructions and got some stripper from the hardware store. 

Here is the table BEFORE:

After I put the first coat of stripper on, I forgot to read the part that said "do not do in direct sunlight." OOps. It dried right up and didn't strip. So then I moved it to the shade and tried again. It worked, a little. So then I applied it again, and again. And then again in certain stubborn spots, using almost the whole can. Then I took it into the garage because I realized this was not going to happen in one day. In the garage I added some more stripper to certain spots again. Then I sanded the top. Originally I wanted to stain the entire thing a lovely brown. After stripping the top I realized it was going to be near impossible to get it all off the legs and curves and lines and grooves, so I gave up on that. So I sanded what I could of the rest to paint over.

Here it is DURING:

I used some leftover stain we had from a dresser then bought a little can of paint mixed "Wedding Cake" from True Value. It's a lovely delicious white with a hint of buttercream. (haha. Cake? Buttercream?) A n y w a y s..... I put 3 coats of stain and 4 coats of paint on it, followed by a can of glossy polyeurethane I found in our garage. I love the way it turned out (after several weeks!) and I have no idea how long the finish will hold out, but it's good enough. The total cost for this project was about $12, $8 for the stripper and $4 for the paint, the stripping knife, sander, sandpaper, sponge brushes and poly I already had.

Here she is AFTER:


What do you think? I like it so much I thought it might look cute to paint another one of our tables all white on the bottom.... BUT, let's not get any more crazy ideas.

Have a great weekend :)

Adding link to http://www.lizmarieblog.com/2014/05/inspire-please-linky-party-9/
http://thriftydecorchick.blogspot.com/2014/06/june-before-and-after.html

Sunday, December 15, 2013

DIY Wood NOEL Letters with Berry Wreath {Quick, No Cost Project}

Last week while I was checking out some Christmas home tours through blogland, I came across these cute NOEL letters and I thought "hey I could do that with some old ones I have!" So this was my inspiration which you can see by going HERE:

DIY "Noel" display from The Chronicles of Home

Now my letters are small but it was fun to make them "new" again.

BEFORE:

AFTER:

I used dark and light burlap and scrapbook paper, white paint, elmers glue and the berry stem all things I had on hand so I spent zero money (woot!)


Have a great week!