Showing posts with label organization. Show all posts

Friday, August 22, 2014

The Friday Four Roundup: Back to School Edition {6}

My girls and I spent the first part of the week day in and out cleaning and organizing their space to get ready for the school year. There is so much more to getting ready than just fulfilling the school supply lists and buying new clothes and shoes! I was determined to complete everything on my wish list without spending any money and we succeeded.

1. An organized closet. Kids need to be able to see their clothes easily so they can put together their outfits every day and find things quickly. We are hoping to eliminate some of this stress by laying out our outfits the night before, but it starts here. We hang all shirts, skirts, dresses and coats/jackets. Pajamas, pants, tights, leggings, underwear, socks, hats, scarves and gloves go in the drawers. Shoes go on the closet floor (I have wire shoe racks coming in the mail from Home Depot, the only thing I bought and have been needing to get for a long time anyway). As a side note, toys go in bins, less frequently used and needing-supervision-toys go up, all other go under their bed. If it sounds like I cram alot into their closet and drawers, I don't. Kids don't need 50 of everything. Some of the best advice I ever got was from a friend who has 5 kids, 4 now teenagers, who told me a major way to simplify life, space, and laundry is to only have 8 shirts, and 4 pants per kid. We have a set for warm weather and cold weather and it has greatly reduced wasted time, money and effort caring for all that extra that we don't need. I only buy what I know they like and will wear. I had them go through everything- rack, drawers and bins- and get rid of anything they don't use or want, then put everything else away nice and organized. Another side note- on top of their dresser is the only space I had to give them a "shelf"- they each have a side and space to put their knick knacks and treasures and they appreciate having their "own space" to display and keep their special things.

2. Tidy homework station. Again, they each have their own space. Boards and clips I made to hang their art and whatnot and plastic drawers to keep their supplies.

3. A place for their backpacks. I'm pretty sure most moms dislike when everyone comes home and dumps their stuff everywhere and throw their backpacks on the floor. We had hooks in the hallway, but even with anchors, they were falling out and destroying the wall (I don't know WHAT they keep in their packs to make them so heavy!) So I took them down and patched the wall. I found some heavy duty over the door plastic hooks I had that weren't being used and the girls helped me decide where to put them. We decided to hang them over the foot of their beds because they are easy to reach and it holds them well.

4. Organized bathroom drawers. This might not be as big of a deal for boys, but for my girls, HAIR is probably the number one reason we are late to school! I asked my girls to empty the bathroom drawers and go through everything, getting rid of old or unused hair stuff. I let them organize it however they wanted with what we had. They decided they each wanted their own drawer and to divide everything up between the two of them. They also decided they would pick out their hair stuff and decide how they are going to wear it the night before along with their outfits in hopes of saving time in the morning and getting to school on time. I was so proud of them for coming up with this idea on their own and will definitely be encouraging them to follow through!

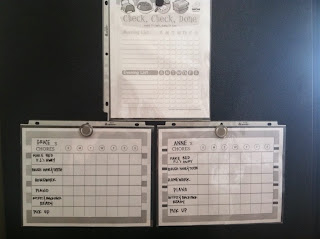
Bonus #5. Chore Charts Lastly, I printed up these free chore charts found {here}, to help keep us all on track!

Happy back to school season, everyone. Have a great weekend!

Sunday, August 17, 2014

Quick Fix: Family Scrabble Letter Magnets {Organization Craft DIY}

In preparation for the kids going back to school, I decided I wanted to take advantage of the side of my fridge for a "command center." I love these magnetic clips, I've had a few that I bought since we got married and I decided I needed more of them so I could quickly hang up a bunch of school papers or whatnot at once, and that everyone in our family needs their own. (That's my idea of organization, ha!) I had a $5 off any purchase rewards thing from True Value so I went and bought 4 more magnets which ended up being free. I have a box of old scrabble tiles and plenty of hot glue, so I went to work!


I love 'em. And it cost me nothing. And now everyone has their own "spot" on the fridge. Triple win.

Happy Monday everyone! Our last week of Summer~

Monday, February 25, 2013

Getting Organized: My Home Cleaning Schedule

Last week I came across a pin on pinterest about making a weekly cleaning schedule that works for you. Basically taking 15 minutes a day and tackling one chore each day to keep your home maintained. It inspired me to type up a new list for myself and I am satisfied with what I came up with, especially knowing it should be realistic and what works for me.
I took the idea I saw on pinterest and combined it with two other lists I have- one from Martha Stewarts book on housekeeping and one from a Real Simple 2005 magazine. Here is what I came up with, my master cleaning schedule from each day to every year. Feel free to print this for your own personal use!


WEEKLY CLEANING SCHEDULE
MON: 
All laundry, fluff pillows
Dust & vacuum thoroughly
TUES:
Kitchen, wipe down all surfaces, disinfect counters & sink, mop floor
WED:
Clean upstairs bathroom
THURS:
Organize papers, desks, file
FRI:
Clean downstairs bath (kids)

MONTHLY
vacuum upholstery
wipe/disinfect trash cans
disinfect doorknobs
dust ceiling fans
wipe down cabinet fronts
clean inside microwave
clean out magazines
wipe windows

3-6 MONTHS
flip mattresses
launder pillows
clean window treatments
clean out fridge, vacuum coil
dust baseboards
scrub shower/tub
launder rugs, mats
vacuum lamp shades

YEARLY
clean inside of cabinets
scrub tile grout
touch up paint, wood floors
clean carpets

Monday, August 27, 2012

Girls Room {update}

Welcome back to the Girl's Room! Since school started today (yay!) we finished organizing their closet, bringing in their new school/fall clothes, pulling out the old play/summer clothes and getting their new desks ready for homework!
You can see the original post of the Girl's Room Reveal HERE.
So here are a few quick pictures of three updates of their room - the wreath, their desks, and their closet.

Here is the wreath BEFORE:

And the wreath AFTER:
You can read all about how I made this wreath HERE.

Here is the creative space and old table BEFORE:

And here are their new desks AFTER:

BEFORE:

AFTER:
I found these desks at a county school yard sale for 10 bucks each. I originally had something wood in mind that I could paint, but this was all they had and in my small town, options are very limited. The price was right, it's always a plus finding a pair of something, and I actually really like them now! They were old computer desks. They are metal and have that modern industrial feel. They actually sell ones very similar to this at Crate and Barrel or CB2 painted a bright orange for lots more $! They are sturdy and the girls like them, so I can't complain!

And finally, here is the closet BEFORE:

And AFTER:
I thought it was such a great idea to buy one of those closet rod extender things and then the littlest girl could hang up her own clothes. After getting over the fact that she thought it was a better idea to climb on it and hang from it like a monkey and broke it, I decided I like this much better anyway. Now they each have their own "side." Toys and books are organized in an Ikea Expedit shelf. Toys that need permission before getting down or that make a big mess are stored on the shelf above. There is also a shoe shelf on the left and a laundry basket of dolls and stuffed animals on the closet floor sides that you can't see. So far, this system works the best for us.

Well that's the Girl's Room for now! Thanks for stopping by and Happy Back to School to all you moms out there!

Friday, May 25, 2012

A Happy Find & Quick Fix {organized scrapbook paper}

Searching for a good, affordable scrapbook paper holder, I found this on Amazon. Kaisercraft Scrapbooking Paper Unit for $15 - priced way below anything else I had seen and it fit my needs and wants perfectly.
It comes flat packed and I used wood glue to make it more sturdy. And I love it!!!
I can't wait to get started on my favorite craft: cardmaking! It's been WAY too long.

Friday, February 3, 2012

Organizing Ribbon {easy, practically no cost project}

I've been wanting (needing!) to organize all my ribbon for a while. When I saw these little packages of ribbon clips on uber-clearance at JoAnn, it motivated me to do it. I'm pretty sure I spent less than $1 on the clips. The rest I already had: plasric shoe- box size container (you could use an old box or shoe box for free) and a stack of collected cereal and snack boxes. (you should start collecting them anyway- the uses for the cardboard are endless, and FrEe!)
Then I just eyeballed a cardboard template by cutting into the cereal box and then used that to cut out a whole stack. Then I organized the ribbon by color, then from large to small. The small ribbon didnt work with the clips so then I used tape or pins. You could do this also and completely skip the clips for a totally no cost project.
It was so satisfying to get this done and go from two boxes and a bag of ribbon down to one nicely organized box, a small bag a scraps, and a bag thrown out.
What about you? Did this project inspire you to organize your ribbons or crafty things? How do you organize your ribbon?

Thursday, November 10, 2011

Boys room before & after: streamlined storage with Ikea expedit bookcase

Last night my husband went to a friend's house to pick up something. And he came home with this! Just minding my business and a $70 Ikea expedit bookcase is dropped in my lap for free and I have to figure out what to do with it? Awesome.
The girls already have one of these for their toys, and we love it. Since the ol' bookcase isn't that sturdy (especially for sturdy lil' boys who like to climb), AND he wont need a changing table forever, AND when the girls grow out of their toy tubs we can just transfer them to this room... it made perfect sense to put it in here. And I love it. The whole room feels so much more streamlined and organized. And there's plenty of room to spare for all his future toys!
A quick presto- chango with a bookcase I love for free- that's Rebecca's Roundup style!!!

Friday, April 1, 2011

Jewelry: Organized!


I love these! This is a guest post from my sister in law. Says Karen:

I have too much jewelry. Well not too much, just not enough space to hold it all.
Enter 2 cork bulletin boards $4 from my favorite thrift store.
Paint the frames black. Don't Worry about the cork, it will be covered.
My S-I-L is always telling me to go simple and try for clean lines. Hello this 100% un-dyed natural cotton does the perfect job. Walmart $2.00. Using the most versatile tool in my house, (my Pampered Chef scraper) I tucked the fabric under the frame.
Not only do I love looking at all my jewelry now, so does everyone else. My little girls, my hubby. It is some perfect wall art and super organized.

Thanks, Karen!

Thursday, August 5, 2010

It's beginning to look alot like... BABY!!!

Here is a little teaser as to what's in my mind of how I want the "Nursery" to look. Hopefully I will be able to show you AFTER pics when it's all put together!
I know these pics AREN'T PRETTY, folks, just KEEPIN' IT REAL! This is what I am workin' on right now and there is baby stuff EVERYWHERE! You KNOW I HATE CLUTTER and I am gonna get my hands on this today and make it all better and organized :)


Wish me luck that I don't go into labor early and look for upcoming pics of the final results!!!

Friday, July 2, 2010

PROJECTS Week of June 27th: Wood Quilt, Chore Chart, and Happy 4th of July!

#1: My first post is from my clever crafty sis-in-law.(You can see some of her other cuties here and here.) This is the Liberty Scrap wood quilt. She got this idea from knock-off wood.com which you can see by clicking here. She says, "I used a pallet for the wood. It cost me $5. That's for everything including paint and nails." She got a free pallet and took it apart and used all the wood from that. Then a friend gave her some wood backing. And she made two. 5 bucks?! That's MY kind of craft! That's why I think she is so clever and crafty, she is always thinking up ways to do stuff for the cheapest- just like me! Thanks for the show and share, sis, it looks great!
Project #2 is what I've been working on this week. I have been wanting to create a chore chart. I have looked at all different ones but none met my fancy, until I saw THIS ONE on one of my favorite sites, Brown Paper Packages. Here is my Budget Version!
Supplies: Foam board from dollar store, packing tape (you can get at $ store), clothespins from $ store, ribbon, shape punch, and clip art from computer. Also glue gun, reward stickers or such (can also get at $ store), scissors, cardstock, and paint or paper or ribbon if you want to clothespins different than their natural form.
Prepare: paint clothespins.
First, print up clip art from computer matching the chores you want. Print and if you dont have a color printer, color. A square punch is in the pic, but I ultimately decided to use a round punch for each chore picture.
Second, punch out enough circles to have a reward sticker or phrase on the opposite side of each clothespin. Attach stickers, or write or stamp phrase on circles.
Third, attach packing tape to circles. WHY, you ask? This is my cheap way of laminating! I'm pretty sure I invented this. I put the circles on one end of the tape and then folded over the tape and cut them out. This is just to make them sturdier so they don't get bent from little fingers.
Fourth, cut board according to size. One thing I was not anticipating was the yucky raw edge that happened when I cut it. So I glued white ribbon "binding" around the edges.
Fifth, GLUE! Glue the circles to the clothespins, glue names to the board, glue ribbon across board for each kid, glue hanger to back of board.
Chore side, then when completed....
Reward side!

Finished project! Each child has a row of daily chores, the third row is for stuff that only occurs once a week or so.
Total cost: Foam board $1, clothespins $1= a whopping TWO DOLLARS! Everything else I already had! What'ya think? I think I'm just glad that it's DONE! And the kids totally love it, too:)

Friday, November 6, 2009

SMART & "SNEAKY" STORAGE

Do you live in a small space like me? Or does your "linen closet" look like this? Wall to wall stuffed to the brim with blankets, etc...

Here is a king size pillow sham. A lovely little number I got from Ballard Designs a long time ago. This thing is huge. So I decided to create some SMART STORAGE with it!
I put all our sheets and pillow cases for the bed in here. Sneaky, eh?
Just fold the sheet and it sits nicely in there.
Then zip it up.......
And no one will ever know! An added bonus: The sham is stuffed and it looks better that way!