The thing about blogs and pinterest and all these online DIYers, is that when you read them, you tend to get big ideas. Ideas that are so big that when you are in the middle of them you think, "why the heck did I think this was a good idea? Now I know why they just painted this thing black. This is a big headache and it's probably going to only be a week before my kids scratch it, knick it, and chip it." Well, either way, I did it. I love the way it looks now. But I think next time, I'll just wait till I'm rich and have money to buy exactly what I want! Sorry, if you were looking for DIY inspiration, this probably isn't the best post :) But I don't like to paint or stain furniture in the first place, so I don't know why I thought stripping and refinishing would be any better. So hopefully you are better at this stuff than me!
We got this coffee table second hand from some friends. It went to my husband's office, then we inherited it when his office closed. Which I was really excited about since we haven't had a coffee table for 5 years and this one is solid wood and substantial. The black paint they had done over the original finish was chipping and peeling so I figured it was time for this table to get a new life. After I saw someone do this on a blog, then read about it on ehow, it sounded easy peasy. So I read all the instructions and got some stripper from the hardware store.
Here is the table BEFORE:
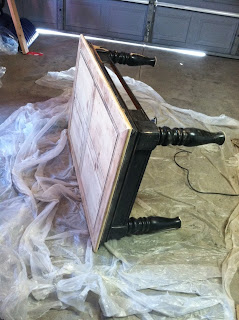
After I put the first coat of stripper on, I forgot to read the part that said "do not do in direct sunlight." OOps. It dried right up and didn't strip. So then I moved it to the shade and tried again. It worked, a little. So then I applied it again, and again. And then again in certain stubborn spots, using almost the whole can. Then I took it into the garage because I realized this was not going to happen in one day. In the garage I added some more stripper to certain spots again. Then I sanded the top. Originally I wanted to stain the entire thing a lovely brown. After stripping the top I realized it was going to be near impossible to get it all off the legs and curves and lines and grooves, so I gave up on that. So I sanded what I could of the rest to paint over.
Here it is DURING:
I used some leftover stain we had from a dresser then bought a little can of paint mixed "Wedding Cake" from True Value. It's a lovely delicious white with a hint of buttercream. (haha. Cake? Buttercream?) A n y w a y s..... I put 3 coats of stain and 4 coats of paint on it, followed by a can of glossy polyeurethane I found in our garage. I love the way it turned out (after several weeks!) and I have no idea how long the finish will hold out, but it's good enough. The total cost for this project was about $12, $8 for the stripper and $4 for the paint, the stripping knife, sander, sandpaper, sponge brushes and poly I already had.
Here she is AFTER:
What do you think? I like it so much I thought it might look cute to paint another one of our tables all white on the bottom.... BUT, let's not get any more crazy ideas.
Have a great weekend :)
Adding link to http://www.lizmarieblog.com/2014/05/inspire-please-linky-party-9/
http://thriftydecorchick.blogspot.com/2014/06/june-before-and-after.html
Adding link to http://www.lizmarieblog.com/2014/05/inspire-please-linky-party-9/
http://thriftydecorchick.blogspot.com/2014/06/june-before-and-after.html


Thank you for your hard work! It looks great! You forgot to mention about how your son "helped you" by sneaking into the garage and spraying lacquer in one spot on the table top after your final coat, then scratching it out with a screwdriver....
ReplyDeleteAmazing!
ReplyDelete